Note: Due to recent changes with third-party cookies, affecting all browsers and all solutions, Akamai has advised that SSO will not always operate in a consistent manner. For further information about what effect this has on you, please reach out to your Akamai Account Representative.
🔨 How it works
- Visit your Account Settings and navigate to the Akamai (Janrain Settings) tab.
- Fill in the relevant Akamai settings and click Save.
Pro-tip:
- SSO settings are recommended but are not required to enable registration, sign-in, or enrichment.
- Global Opt is an organization-specific setting and is not required to enable registration or SSO.
- Once your Akamai settings are filled in on the account level, add an Akamai integration to a specific survey:
- Visit the builder of the survey you'd like to add an integration for.
- Click Add Question.
- Add both the Registration form question and Sign-in form questions. On the Registration form, you must ensure that the post attributes are filled out for all fields required in Akamai for your registration to be completed. You can find the post attribute fields by clicking on +Registration Metadata at the bottom of the page.
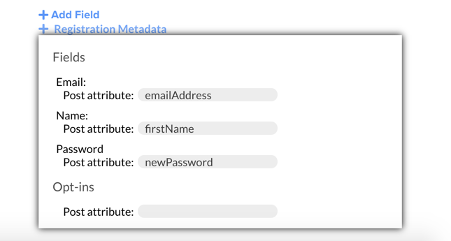
- Any additional fields you'd like to be passed to Akamai should also have a post attribute filled out.
Note: The post attributes must exactly match your Akamai database attributes.
- To enrich your user profiles with survey question answers:
- Go to the Survey Editor and click on the Configure tab, then navigate to the Integrations tab.
- Click + Add for the Akamai Identity Cloud integration.
- Fill in the Attribute fields and associated answer choice values.
Pro-tip:
Labeling plural attributes: A plural is a special type of attribute that functions as a relational table within an Akamai user profile. Plurals function as "child" attributes under the user profile, allowing multi-layers of data to be associated with a single user.
For example, if your survey asks questions about a respondent's dependent (i.e. child or pet), this information is defined in the Akamai integration as a plural attribute, which can contain multiple nested attributes.
- Set the Nested attribute label (i.e. dependent) and define the nested element to be updated based on Sort Key, Sort Order, and Null Value. Only one nested element per question response can be updated.
Pro-tip:
Sort Key: Defines by what data field you would like Akamai to sort the nested attribute. For example, you can choose to sort by birthday to order dependents by age.
Sort Order: Now that you have chosen an element to sort your attributes by, you can define the order you would like the dependent data to be updated, in either ascending or descending order. Referring to the above example of birthday as a sort key, if you choose to update by ascending, then the attribute of the youngest dependent will be updated.
Null First/Last: You may have values in Akamai that are null. If you want to override the Sort Order to prioritize populating the null value, you can sort by Null first. Contrastingly, to ignore all null values and follow Sort Order, you should choose null last.
- Additionally, you can customize the date field controls in registration forms. The dates are available for selection using the "Date Range" picker from the field control bar.
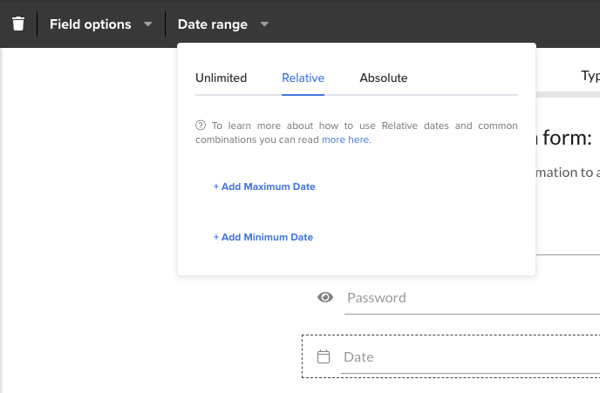
The date picker allows you to support multiple use cases when collecting dates by using a combination of either Relative or Absolute time frames, both minimum and maximum are settable.
Pro-tip:
Unlimited: There are no limits applied to the date ranges selectable.
Relative: This allows you to apply relative dates, such as "10 years ago" to the date ranges selectable.
Absolute: Set an absolute range in which the respondent must select a date.
Here are some example use cases and combinations:- Collecting birthdays: Only allow respondents to enter a date of birth greater than 13 years old
- Set the date field to "Relative"
- Set the Maximum Date to "13 years ago"
- Choosing a day for an appointment: Only allow respondents to select a date between the 22nd of February through the 1st of March
- Set the date field to "Absolute"
- Select the first date to start the range, and then select the second date to end the range