💡 This article covers
What is Dynamic Embed?
💼 What it does
- Dynamic Embed allows you to dynamically display website surveys across your website.
- The tool centers around individual surveys, and setting up conditions or scenarios in which these survey would display across your website.
Scenario setting
- The highest level element is a Domain; these are the domains whitelisted on our platform by your Customer Success Manager, which allow the Dynamic Embed scripts to receive associated Scenarios for the domain. A Scenario is an individual ruleset that explains what actions or rules should be evaluated in order to trigger an individual survey.
- Each Scenario is only associated with one domain, and can only be associated with one survey which is to be triggered upon meeting the conditions. Each Scenario has a unique Scenario ID, which can be manually triggered against a domain. For example, a Scenario ID which is not associated with a given domain will not evaluate, and will fail.
- Scenarios are ordered from the most specific (the top of the list) to least. While there is no limit to how many Scenarios will be evaluated, we recommend you keep these to the absolute minimum, while still achieving the desired logic.
- Each survey can be associated with one or multiple integrations. Some integrations can be enabled multiple times per survey, and some integrations can only be enabled a single time per survey.
Pro-tip: In the cases of single use integrations, different surveys should be created for the various staging and production environments, which should be associated to the different Scenarios and domains. Each survey should have two distinct integrations according to the integrated environment to each associated integrated environment.
Checking whether a respondent has reached the survey goal in a Scenario
💼 What it does
- Segmanta offers a Dynamic Embed SDK with capabilities to receive dynamic information about how a survey's Scenario is executed on your website.
💪 When to use it
- You can request information on whether the survey goal in a specific Scenario has been reached for a respondent. This may be useful, for example, in enabling you to control elements on your frontend website that show if a survey has been taken or not.
The following callback function...
SEG_EMBED_API.hasCompletedScenarioSurvey({scenario_id}, callbackFn(), checkServerBoolean)
... returns with values true / false.
The Scenario ID parameter is the number that identifies the scenario you are looking to check. It can be found in the URL when you create or edit a Scenario.
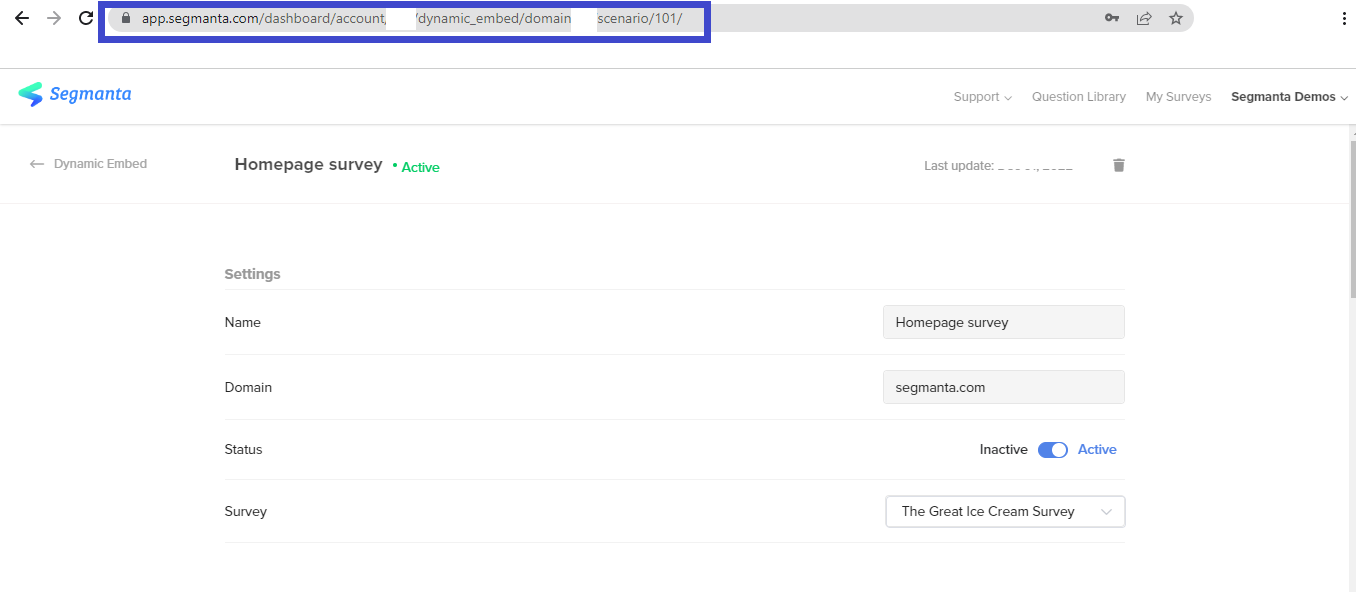
In the above scenario configuration on the Dynamic embed dashboard, the URL is:
https://app.segmanta.com/dashboard/account/<account ID>/dynamic_embed/domain/<domain ID>/scenario/101/ , therefore the Scenario ID is 101.
The checkServerBoolean parameter controls whether the check is to be made against the server side (true) or in the browser using the localStorage information available (false); this defaults to false.
For example, assuming your Scenario ID is 101, your call would resemble the below:
SEG_EMBED_API.hasCompletedScenarioSurvey(101, (hasResponded) => {
// hasResponded will be either true or false, insert logic here
}, true)
Calling the aforementioned method would return "true" if the respondent has reached the survey goal against the server side, or "false" if the goal has not been reached.
The SEG_EMBED_API also exposes an "on" function, which takes an event name (detailed below) and passes back positioned parameters to expose information about "to what" happened.
This event API looks like the following:
window.SEG_EMBED_API.on('SURVEY_GOAL_REACHED', (scenarioid, surveyid) => {
console.log(scenarioid, surveyid)
})
We currently publish 4 events, which we expose through this emitter;
- SURVEY_GOAL_REACHED: The user completed the survey or reached a predefined goal.
- SCENARIO_SEEN_BY_USER: The survey popup appeared on the page.
- PRE_SURVEY_DIALOG_NO: The user closed the dialog before starting the survey.
- RESPONDENT_COMPLETED_SURVEY: The user completed the survey
Events SURVEY_GOAL_REACHED, SCENARIO_SEEN_BY_USER and PRE_SURVEY_DIALOG_NO publish the same information, which are exposed via positional parameters:
- scenarioid --> the Dynamic Embed Scenario ID that triggered the event
- surveyid --> the public survey id which was completed
Event RESPONDENT_COMPLETED_SURVEY publishes an additional positional parameter:
- respondentData --> the Response ID corresponding to that respondent’s survey completion
window.SEG_EMBED_API.on('RESPONDENT_COMPLETED_SURVEY', (scenarioid, surveyid, respondentData) => {
console.log(scenarioid, surveyid, respondentData)
})
The Event Handler enables you to add event listeners before the Dynamic Embed library is ready. Once the library is ready, it will pick up all registered event listeners. You will need to add the code below, just before you register the event listeners.
window.SEG_EMBED_API&&window.SEG_EMBED_API.q?window.SEG_EMBED_API=Object.assign(window.SEG_EMBED_API,{e:[],on:function(E,n){this.e.push({eventConstName:E,callback:n})}}):window.SEG_EMBED_API=window.SEG_EMBED_API||{e:[],on:function(E,n){this.e.push({eventConstName:E,callback:n})}};
The Dynamic Embed Management Portal
💼 What it does
- The Dynamic Embed Management Portal allows you to view and manage all of the scenarios set up for surveys owned by your account. From here you can view all active & inactive scenarios, and click into any scenario to add, edit, or delete scenarios.
🔨 How it works
- Navigate to your Account Settings and select the Dynamic Embed tab.
- Select the domain you want to create a scenario for.
- To add a scenario, click on + New Scenario.
- You will now need to name your scenario, and set up the survey Settings, Domain & URLs, Triggers, Look & Feel, and Additional Settings.
- Preview the survey Look & Feel by clicking on the Preview icon.
- After you have defined your desired survey Triggers & Look & Feel, click Save.
Settings
- Name
Give your scenario a name that is easy to identify when reviewing your scenario list. The scenario name is only for administrative purposes and will not override the survey name. - Domain
This is whitelisted on our platform by your Customer Success Manager. - Status
By default, all new scenarios are set to an active state, active scenarios will begin displaying immediately on your website. Mark a scenario inactive if you may want to activate it again in the future. Delete the scenario if you have no intention of reopening it. - Survey
Multiple scenarios can be linked to multiple surveys. Scroll through the list – in order of creation date – to find the survey to match your scenario.
Domain & URLs
💼 What it does
- Each survey has a single Survey ID with a unique survey URL, and can be associated to multiple Scenarios across multiple domains. Thus, the survey is not tied to a specific domain and has no concept of staging or production environments.
🔨 How it works
- Define which survey you would like the scenario to display. There are three different levels of matching based on pages:
- All pages
This capability allows you to display the survey in all pages of your domain.
- Specific
This capability allows you to specify the inclusion of a URL.
- All pages
-
- Advanced
This capability allows you to include and exclude URLs. You can create a condition using the following to create a match with the survey's full URL or a URL's pathname.- is: Use this for an exact match.
- contains: Use this to match if URL contains a certain element
- starts_with: Use this when matching from the beginning onwards.
- ends_with: Use this when matching the ending.
- regex: Regular expressions contain a series of characters that define a pattern of text to be matched. This is a code that can be used to evaluate URLs on. This is used for specific rule sets.
- Advanced
Triggers
Segmanta offers 7 triggers, which are used to define when your survey should display on your website.
🔨 How it works
- To define a trigger, visit the scenario you would like to edit or create a new scenario.
- Manual Trigger
Only shows if manual Javascript code ran and all conditions were met.
- Manual Trigger
-
- Show on exit
Displays the survey when a respondents displays an intent to exit the page (i.e. moves the cursor to the top of the tab or address bar). This trigger only works on desktop.
- Show on exit
-
- Min. Page session time (seconds)
Displays the survey only after the user has spent a certain amount of time on page (defined in seconds). This is also known as loitering.
- Min. Page session time (seconds)
-
- Frequency (%)
Displays the survey to a certain percentage of users (defined in percentage). By default this is set to 100%. This is a best-effort way by Segmanta to A/B test an organization’s respondents.
- Frequency (%)
-
- Cap
Stops showing the survey after it has been triggered for a specific user with the defined number. For example, once a user has seen a survey 3 times, it will not pop up the fourth time they visit your organization's website.
- Cap
-
- Landing page
Only triggers the survey to users who landed (arrived to your website) on either all pages or defined pages. Setting is similar as the pages from Domain & URLs section.
- Landing page
-
- Unique
Does not show other surveys to a user after they have been shown the linked survey. For example, if three scenarios match, Segmanta queues them from most to least specific and then executes them all. When the unique trigger is employed, once the scenario is answered, no further scenarios are shown. So if three were to match and one is unique, no further scenarios are shown.
- Unique
Look & Feel
💼 What it does
- After defining your Dynamic Embed survey trigger, the Dynamic Embed Survey Look & Feel allows you to decide how you would like the survey to appear on page when triggered.
- Segmanta has two distinct look & feels type, however, your organization can override this as much as you want with your own custom HTML.
- In the corner
Your survey will appear on one of the corners of your site, it will open from a small Feedback button that will display on the corner that you determine in your scenario settings. - As a popup
Your survey will appear as a popup in the middle of the page. The size of the popup must be a pixel – not as a percentage.
Within each type, you can change the following:
- In the corner
-
-
- Survey size: The size of survey when it appears on screen.
- Corner button caption: The text to be displayed on the corner button.
- Corner button alignment: Determines whether the corner button will appear on the left or right side of your website.
- Corner button height on desktop: The distance (in pixels) from the bottom of the page to the corner button. You can define a different number of pixels for desktop versus mobile
- Suggestion Dialog: When toggled on, the survey is will show dialog box that will allow the user to decide whether they would like to take the survey, skip the survey or have the option to take it later. The following settings can be configured accordingly.
- Title: Main text of the dialog box
- Subtitle: Secondary dialog box text
- Later button: When your user clicks on this, the dialog box will close and a corner button will appear on the page allowing the user to open the survey later on in their site visit.
- Survey size: The size of survey when it appears on screen.
-
Additional settings
- Show welcome page
When toggled on, the survey will skip the welcome page and the first page your respondent will see will be the first question page. - Close on ending
When toggled on, the survey window will automatically close as soon as the respondent reaches the ending page.
The following video shows a preview of the survey's Look & Feel.
Integrating a Dynamic Embed tag on your website
💪 When to use it
- Implement the Dynamic Embed Tag across your website and any associated staging websites or environments to instantly transform website traffic into actionable insights. Using website surveys, you can:
- Optimize your conversion funnel, content, brand and inventory based on timely, relevant feedback from your visitors.
- Measure and track changes in NPS, website satisfaction, and opinion trends over time.
- Capture new, pre-enriched leads and increase user engagement rate and conversions with personalized buying guide surveys.
- Identify the “why” behind user intent and assess if the user’s objectives were accomplished.
- Collect data on user preferences and consumer opinions.
- Benchmark your brand.
🔨 How it works
- A snippet is added to your website, which is then sent to Segmanta with the domain name your organization is currently on. To implement, follow these steps:
- Choose the domain/s associated with your account.
- Click on the Get Code </> icon.
- To activate your Dynamic Embed, copy the code. This is the only developer work required.
- Paste this code directly after the opening <body> tag across your website.
- Once a single code is implemented, there are no further developer or technical skills required to implement or manage Dynamic Embed survey scenarios.
Pro-tip: The dynamic embed code can be implemented using Google Tag Manager as well as directly in your website code. Click here to learn about the Google Tag Manager integration.